Immersive Arts Lab Prototype
Introduction
My various experiments with a range of immersive technologies (with differing levels of success) determined the direction I went with a prototype immersive project.
Inspired by the speed and relative ease of getting a high-quality 3D model of real-world objects using photogrammetry, I began to think about the possibilities of this technique within a larger project.
I have previously designed and built virtual worlds for use on the social platform Mozilla Hubs, so world-building has been on my mind a lot. I began to think about the ever-increasing ease with which people can make accurate 3D models, and how this offers interesting possibilities for creators, for example capturing an artists ‘home-world’ whether on social media, as a public piece or for more personal memory capture.
With the advent of user-generated content platforms, there has been a shift – both in terms of business models and as a paradigm shift for users – whereby people are empowered through technologies to become creators. This has enabled, I would argue, the potential for greater self-expression.
Digital networks connect people in a new kind of ‘networked society’ which is fundamentally changing the ways humans interact. As a creator, I am very interested in the new emerging affordances provided by these networks when combined with various technologies.
Initial ideas
I began to think about the individuals’ relationships to the people in their networks, particularly in the areas of self-expression, creativity, archiving and storytelling.
Working with the concept of a homepage (or profile page) evolving into 3D, I asked the question: How will people create and present their homepage/homeworld?
Further conceptualising
Telepresence is the “ability to ‘be’ in a place other than the physical location in which your body resides”
Manovich, 2001
Telepresence for artist and audience
I began thinking about how artists have been forced to present their works via the Internet due to the covid pandemic. It has been very interesting to observe the pandemic fallout for artists, and how they’ve responded.
I noticed a huge increase in live streams by musicians across a range of platforms that offer this; social media, Twitch, Mixcloud. Often the musician would point a camera at themselves for this, and I found this rather boring. The potential of that medium (a live stream of sound and visuals) can be more than what most were doing. Some were experimenting with overlays, live effects and multi-cameras which was interesting. What is effectively happening most of the time here is that the audience is being brought into the artists’ space for performance in real-time, with the added affordance of live interactive chat between the artist and among the community that is the audience. It’s a variety of rudimentary telepresence.
I have personally done live streams in this way – performing music with a video stream with live effects, so I have a personal interest in how to improve this process.
I asked myself a series of questions:
- How might this concept of artist-audience telepresence be further enhanced by immersive technologies?
- How can the artist take greater creative control of the environment they bring their audiences into?
With the increased presence and immersion brought by the affordances of VR, I saw the potential for this medium to be used for something similar.
Telepresence with archiving
Also emerging from my learnings and thoughts were the concepts of how archiving can be enhanced using photogrammetry. I thought it would be interesting to explore this more, and felt it could exist in this prototype alongside the artist-audience theme. I also felt that the preservation of a real-world space in the form of a 3D textured model was valuable. I imagined this as relating to the practice of home movie making which was brought about by the advent of consumer camcorders in the 1970s through to the video recording smartphones of today.
I began to think about the value it might have for my young children to be able to visit a 3D capture of rooms within my house in years to come. And how I might enhance that experience by personally narrating parts of it, telling stories about objects in the room for example. In this way, it would serve as a walk-in time capsule of the space, and my voice, thoughts and feelings. This concept interested me a lot. It made me think of my grandfather’s home video recordings which he would often make on family occasions when I was growing up through the 90s. I wondered how the experience would be enhanced by my daughters being able to go inside a life-size model of the space they grew up in. How might this affect memories, of the space, and me and our family?
This is interesting for artists presenting immersive works in all mediums, for users presenting themselves in a social sphere, say in social media and for personal or public (archiving) memory capture. My prototype is applicable to all of these interests.
Prototype practical steps
Photogrammetry
I began by setting out to capture my living room using photogrammetry to create a 3D model with a close resemblance to the space.
To make the space feel authentic, I wanted to use the real lighting that is featured in the room- a couple of ceiling lamps, a couple of table lamps and an uplight. Rather than try to emulate these in a 3D application such as Blender, Unity or Unreal, I decided to preserve the actual room lighting by capturing the images without additional set lighting. By doing this the room’s original lights were baked into the captured photos, which would later be turned into model textures. The technical challenge this provides is that inherently this is a subject with low lighting, giving the need for certain camera settings. Additionally, photogrammetry requires low-noise images, as well as large depth of field for sharp focus throughout a scene. Given these technical requirements, I needed to strike a balance in-camera settings.
I ran an initial test using raw photos captured on my iPhone 11 Pro. The results were promising but I wanted to see how a dedicated full-frame camera would improve the situation, so I borrowed a Sony A7 III from a friend.
Using full manual settings I opted for a low iso (for low noise), long shutter speed (giving the need for a tripod), and small aperture (for greater depth of field).
I took approx 160 photos with the Sony camera in RAW format.
I converted these to TIFF using Adobe Lightroom and imported them into Agisoft Metashape where I proceeded to go through the photogrammetry workflow, first generating a sparse cloud, then a dense cloud then a model, then a texture…
I wasn’t very pleased with the results… several unaligned images, lots of artefacts including texturing errors and model inaccuracies. I wanted to take another couple hundred images of the room but I no longer had access to the camera, and it wasn’t in the scope of this prototype work to take the extra time to do that. So I decided to proceed with the model in its current state- this being good enough for the prototype, knowing that much higher quality photogrammetry of rooms is possible with more images taken from more angles.
As I wanted the experience to run on an Oculus Quest (with potential for a WebXR version) I had aims of the max poly count being around the 50,000 mark. So I used the Metashape decimate tool to reduce the model down to 50,000 (I also tested 20,000 but opted for the former due to closer reproduction of the objects).
The default texture settings were quite low resolution, and when exported (and compressed from to jpeg) became very blurry. So I decided to generate a much larger texture to allow for greater detail… I opted for 16384×16384 pixel resolution. I found this preserved a lot of the text in the environment. The combination of the low-poly model with the high-res texture created a model which looks and feels like my living room.
I exported the model and texture as an FBX file as my research showed this as the most compatible format for importing into Unity.


Content for the scene
Stories
Considering the three areas of interest: archiving, social media presence, and performing artists creating immersive performance spaces, I wanted to tell stories about objects in the space, so I picked some items for this prototype:
- my DJ turntables, mixer and records
- a decorated belly cast ornament
For a future project, it would be ideal to have many more opportunities to tell stories from the space utilising other interactive items.
Creations
I wanted to explore how I could use the virtual space to present some of my artistic creations, for example:
- Music compositions and recordings
- Binaural audio compositions and ambisonic recordings
Unity project setup and development
As a newcomer to Unity, I knew this would be a learning journey. I had a starting point in a guest lecture that Keith Mysers from AVImmerse had given on Unity not long prior. I chose to develop the project using the Unity game engine based on a few deciding factors:
- I had previously successfully set up and tested the development and deployment of VR app builds to an Oculus Quest 1 using Unity on a Mac.
- Unity is widely used across mobile platforms so the project could later be deployed not only to Oculus Quest but also to Apple AR with ARKit and Android AR with ARCore, also as a mobile app for viewing with a 2D screen.
- There is a good community of Unity developers so any issues I faced during development should be quite easy to troubleshoot through internet searches
- Due to the above I wanted to develop my content creation skills and experience within this environment
I began by setting up a new project for VR development. Configuring Android build settings for Oculus Quest based on an online tutorial was fairly straightforward. After some XR-specific package importing and associated XR GameObject additions and configuring the scene, I was ready to go.
I set up a continuous locomotion system so the user could move around the space using the left thumb joystick for gliding around the ground plane, and the right thumb joystick controller for snap turning. The user can also move around with 6-degrees of freedom (6dof). I started adding a teleportation system but decided it wasn’t necessary for the prototype, but could be added at a later date if and when necessary.
Some key issues and challenges I faced included:
- On Mac, Unity ‘build and run’ on connected Oculus Quest does not work when the Oculus Hub app is running. There seems to be some kind of conflict with the two apps connecting to the headset at the same time. Solution- keep Oculus Hub closed!
- ‘Build and run’ is very time-consuming. This is the only way to test a project when developing a Unity project for Quest on the Mac operating system, especially when lots of iterations need to be tested. In future, I would try to develop a Unity VR project on a Windows machine where one can simply click play to live-preview the project on the headset… with no need to build and run!
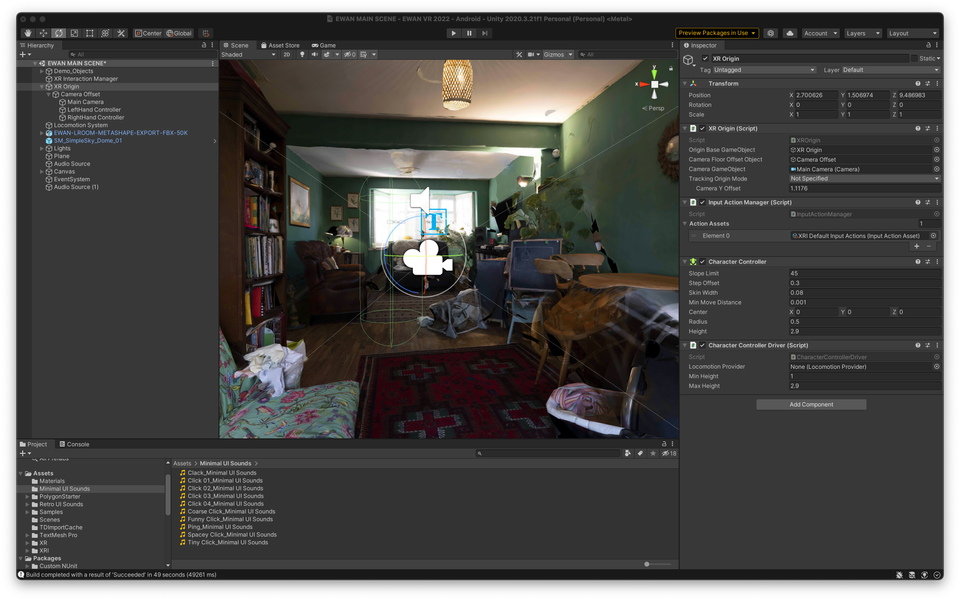
I imported the FBX file into Unity where it was automatically lit by the scene lighting and as a result, didn’t look realistic. So I set the texture to unlit which left it unchanged, preserving all the baked environment lighting from the photo capture stage (with the plus of a small performance improvement due to fewer lighting computations needing to be made).
I noticed the texture was again blurry. After some investigation, I found this was due to the default texture settings in Unity being to apply downsampling and compression to textures with a max res of 1024. I changed this to 16384 and the texture looked sharp once more.
I added some collision boxes to keep the user inside the room and added ‘Character Controller’ and ‘Character Controller Driver Script’ components to the ‘XR Origin’ to make the user collidable.

Next, I wanted to enable some kind of user interface for the user to be able to activate multimedia stories for each featured object. For this, I used the UI button objects to label the object and provide the user with familiar and ubiquitous play and pause controls.
I added an AudioSource GameObject to the scene for stereo (non-3D playback of audio). I then went into the OnClick() settings of the play and pause buttons and configured them to play and pause audio clips which I’d imported into the project assets.
I found that I could also enable GameObjects using this button OnClick() section, so I did this, for example with the belly cast item, the buttons set the photos, video and the large 3D model to enabled, and the pause button disables them. For this to work properly, I had to set these GameObjects to disabled before building the project, so that when a user first enters the experience these elements are not visible.
Code induced headaches
Unity uses C#, which I have no prior experience with. I do have experience from a long time ago with C++ which is also an object-oriented language. However, during prototyping, I needed to progress quickly rather than spend a long time learning C# (and any Unity specific) syntax.
Towards the end of the prototype, I discovered a huge time-saving tool in this respect; Bolt. Bolt is Unity’s visual scripting tool which was added to the software initially as a free package that required manual installation but from Unity version 2021.1 it is included in the Package Manager without the need for a trip to the asset store.
I discovered it after trying to code some basic UI functions relating to a splash screen I wanted to appear right at the start of the experience. After not getting very far with C# code I discovered and installed Bolt and had the functionality I wanted within a very short space of time… satisfying!
The method I used for the splash screen was a canvas (with a black plane and some text) set to render mode ‘Screen Space – Camera’ so that it is anchored to the user camera no matter where they look. The Bolt graph simply waits for a few seconds, then sets the alpha channels of the text and plane objects one after the other. This is very basic but much more could be done here for onboarding the user.

Bolt opens up the potential for people with lower levels of coding experience to design and test concepts with the Unity engine and build projects faster without the need for consulting more advanced coders. I can see the potential benefits of this when working individually as a creator or as part of smaller teams.

Higher detail object photogrammetry
I wanted to try doing higher resolution 360 photogrammetry scans of some key objects in the room so that these could be loaded for a more detailed view. I prototyped this with the belly cast. By taking it outdoors on an overcast day I achieved very good lighting. I used an iPhone 11 Pro shooting in RAW format with optimum manual settings.
For this model, I took a different approach. I uploaded the images to the PhotoCatch iOS application which processes them in the cloud and returns a model, using Apple’s Object Capture technology. The app processes the images, generates a model, returns the model preview to the phone and then allows the purchase of the model. In this case, it cost around $2.80 and I uploaded 47 ‘full’ size images to the service. I was very impressed with the results. The model was made of 117,000 triangles, so I decimated it in Blender to a factor of 0.3, resulting in a much smaller 1728 triangle model that still looked very good. Here the texture was more important than the model I felt, to give plenty of detail of the collage on the object. I cleaned up the model by removing some of the mesh which included the table I had positioned it on for the photoshoot.
With some more work on this model, including mesh and texture optimization, the results would be excellent.

The fast speed of this process for enabling non-technical people getting to get accurate digital 3D models of objects impressed me, and I will keep this workflow in mind for future projects.
The next thing I did with this model was to bring it into Unity, place it in the space and add a C# script to it to make it rotate constantly, so the user can stand still and take it all in without moving. In testing the experience I found this an excellent way to view the 3D model. I’d like to repeat this process with many more objects from the space.

Audio recording and editing
I wanted to record myself talking about my DJ equipment/area, so I set up the Reaper Digital Audio Workstation to record from a microphone. After recording this, I imported a recording of a piece of music I composed, sequencing it along with the vocals. I used compression processing to level the vocal signal.

I exported this as a 2 track audio file, then imported that file into the Unity project assets, and assigned it to trigger with the play/pause buttons for the ‘decks’ experience.
Further to this I wanted the scene to have some background ambience for greater realism. I took a field recording I made of nature ambience and added it to an Audio Source object. I set it to quite a low volume as I didn’t want it to stand out. I found it interfered with some of the other sounds, so I set it to lower in volume when the bell cast and decks segments were played/triggered, and return to the higher volume when they are paused. For the ambisonic piece I set the ambient track to pause so the listener can experience the recording on its own.
I also decided to present one of my ambisonic recordings within this experience. For this I edited the 4 channel WAV file in Audacity, reducing its length and adding fade in/out transitions, then exporting to 16bit 4 channel WAV.

Video and audio in Unity
For the pregnant belly cast object, I wanted to bring in a video of the cast being created, along with a photo gallery of the belly. I used a new Canvas in Unity to place the video player, along with a new AudioSource set to 3D audio (so that volume drops off as a user moves away from it). I also added another canvas and imported several images to it. I used the OnClick() section of the play/pause buttons assigned to this object to trigger the video, and display or hide the photos (by enabling/disabling the photos’ parent GameObject.
So now I had two user-controllable experiences within the project. At this stage, the prototype is functioning as an experience that users can take part in. Below is a video showing the project at this stage, captured from within an Oculus Quest 1 headset.
Ambisonic audio with Unity and Oculus Quest
With Unity and Oculus, it’s possible to include stereo binaural and ambisonic formats such as quad-channel recordings. These can then be played back with an ambisonic audio decoder which results in the user headset position translating (through real-time sound processing) the positional elements of the recording, that is, the various audio sources will stay in their absolute position in relation to the user as they move.
For this project, I experimented with this process, and with the quad-channel ambisonic file found that the real-time positional translation had a perceivable delay and a noticeable drop in authenticity/quality. This must be noted for any future work I do in this area. For a high fidelity outcome, my preference for binaural audio would be to deliver it as stereo to the listener and encourage the listener to stay still.
The Unity documentation suggests that ambisonics;
…can provide an audio skybox for distant ambient sounds, and are particularly useful for 360-degree videos and applications.
Unity Documentation
So, this is best used either for 3 degrees of freedom experiences such as 360 video or for more distant ambient sounds (where 6 degrees of freedom experiences would not highlight the lack of distance-related changes to sound).
Conclusions
This has been a very good learning experience for me. The resulting piece functions as a prototype that can be tested, iterated, and extended in the future. I’ve explored new softwares and developed a photogrammetry to game experience pipeline which may come in very useful for future projects. I developed several concepts and tested different technical ways to make them work. This project has laid a solid foundation for my next steps as an immersive artist.
Further evaluation and next steps for this project will be shared in my next blog post.
